Overview
This is Drum Synth, an analogue style drum machine & sequencer. It has five modules: Bass Drum, Snare Drum, Clap, Tom Tom and Hi Hat. Each one is aimed at synthesising that particular sound and can be found in the bottom half of the screen. In the top half are the sequencers, which have similar controls to those in GS Rhythm. Each sequencer has its own tab and plays its corresponding module. In between the sequencer & the modules you find the control strip.
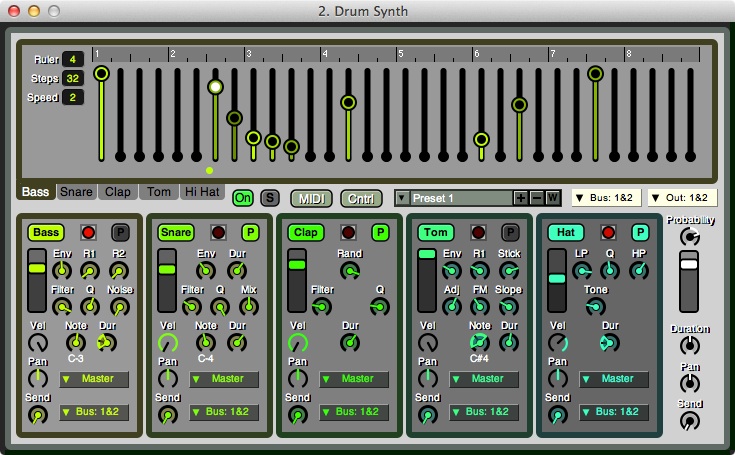
Control Strip
The control strip goes across the middle and manages the general controls of the instrument.
- Tabs [Bass] [Snare] [Clap] [Tom] [HiHat] - opens the individual sequencers for that module.
- On/Off - turns the instrument On/Off. Right or Alt-click will turn other instruments On/Off as well.
- Solo - solos the instrument. Right or Alt-click will solo just this instrument.
- MIDI - opens a window to select the MIDI in & out channels + ports. See MIDI Devices & Controls.
- MIDI Control Editor - opens the MIDI Control editor and allows you to edit the MIDI controls you set up on this instrument. See MIDI Devices & Controls.
- Preset Manager - Add, remove or select presets, see Presets & Programs.
- Master Audio send channel - this sets where the audio effect send of this instrument is going. (i.e Which audio output bus or which effect bus)
- Master Audio out channel - this sets where the audio output of this instrument is going. (i.e Which audio out bus or which effect bus)
In addition there a few controls on the bottom right hand of the screen.
- Probability - scales the probability function found in each module. Increasing this value makes drum hits more likely and decreasing less likely.
- Volume - the amplitude of the instrument.
- Duration - scales the duration of all drum modules.
- Pan - the panning position of the instrument.
- Send - the effect send amp.
The Drum Modules
The 5 drum modules are in the bottom half of the screen and each one shares some similar controls. They emcompass the other controls in the module. I'll describe these from the [P] button at the top right and work anti-clockwise to the bottom.
- [P] - this turns probability On or Off for that particular module. Normally the values (velocity) in the step sequencer control the amplitude of the drums, but you can change it to do other things and this is one of those controls. When this is turned on, the sequencer controls the probability of that hit / beat happening. At the top, the drum will play 100% of the time (i.e always play), at the bottom it will play 0% of the time (i.e. never) and also all the values in between. There is a single master Probability on the very right which scales all the modules and their probabilities.
- Lamp (red) - indicates when the module has been triggered. You can click on the lamp to manually trigger it.
- [Bass] - this is an On/Off button for each module and contains it's own name.
- Amp Slider - the amplitude of each drum's output.
- Vel (velocity) - the extent the sequencer velocity affects the amplitude. This is very useful when using velocity ranges on the other module controls. (See Velocity Ranges below). When this control is turned to the top, this removes the effect of velocity on the amplitude.
- Pan - the pan position of the output.
- Send - the level of signal sent to the effects bus.
- Send Out - the effects bus send channel.
- Master Out - this overrides the Master Out channel in the Control Strip. Select the bus you want for the module or leave as master.
Velocity Ranges
In an effort to make the sequencer a simple but expressive tool to make rhythms with, each of the module's controls has a range. This range is affected by the velocity and can lead to some interesting sequences. To change the range of a control, use alt-click or right mouse button and move the mouse up or down.

For example, here you can see the "Note" control has a range on it so now the velocity affects the Note played.
Module Controls
Bass Drum
The controls for the bass drum are:
- Env - the amount the pitch sweeps down using an envelope. The higher the value the higher the initial pitch.
- R1 - the curve of this sweep is split into two. This controls the rate of the 1st section.
- R2 - and this controls the rate of the 2nd section.
- Filter - the cut-off frequency of the Low Pass Filter.
- Q - the Q of the LPF.
- Noise - the amount of noise in the drum.
- Note - the end note of the bass drum.
- Dur - the duration of the drum.
Snare Drum
The controls for the snare drum are:
- Env - the amount the pitch sweeps down using an envelope. The higher the value the higher the initial pitch.
- Dur - the duration of the noise.
- Filter - the centre frequency of the Band Pass Filter on the noise.
- Q - the Q of the BPF.
- Mix - the mix of Noise vs Tone.
- Note - the end note of the snare drum.
- Dur - the duration of the snare.
Clap
The controls for the clap are:
- Rand - the random distributions of the claps.
- Filter - the centre frequency of the Band Pass Filter.
- Q - the Q of the BPF.
- Dur - the duration of the clap.
Tom
The controls for the tom drum are:
- Env - the amount the pitch sweeps down using an envelope. The higher the value the higher the initial pitch.
- R1 - the rate of the curve of this sweep.
- Stick - the amount of stick noise.
- Adj - the adjusted pitch of phase / frequency modulation.
- FM - the amount of phase / frequency modulation.
- Slope - the slope of the phase / frequency modulation.
- Note - the end note of the tom drum.
- Dur - the duration of the drum.
Hi Hat
The controls for the hat are:
- LP - the cut-off frequency of the Low Pass Filter.
- Q - the Q of the LPF.
- HP - the cut-off frequency of the High Pass Filter.
- Tone - the tone of the hat.
- Dur - the duration of the hat.