Overview
This drum machine is based around the classic sounds of the 505, 606, 707, 808 & 909. These drums sound great but they can be powerfully and dramatically changed. GS Rhythm does this by combining those drum samples with granular synthesis and a high or low pass filter. Each channel has a modulation sequencer which can change the pitch, envelope shape, effect send, time stretch, grain density, grain overlap and filter cutoff of each channel.
The Controls
This is the GS Rhythm's main window.
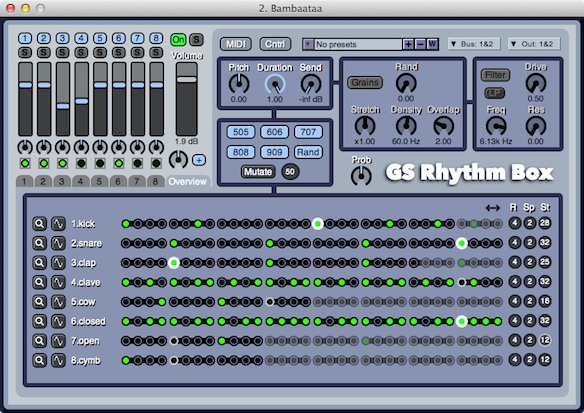
The tabs 1 to 8 below, select the individual drum channels and the Overview tab has master controls for the whole instrument. Here the Overview tab is selected.

Control Strip
This control strip appears at the top and it manages the general controls of the instrument.

- MIDI - opens a window to select the MIDI in & out channels + ports. See MIDI Devices & Controls.
- MIDI Control Editor - opens the MIDI Control editor and allows you to edit the MIDI controls you set up on this instrument. See MIDI Devices & Controls.
- Preset Manager - Add, remove or select presets, see Presets & Programs.
- Master Audio send channel - this sets where the audio effect send of this instrument is going. (i.e Which audio output bus or which effect bus)
- Master Audio out channel - this sets where the audio output of this instrument is going. (i.e Which audio out bus or which effect bus)
Channel Mixer
Here you can mix the individual drum channels together, including control of the overall instrument.
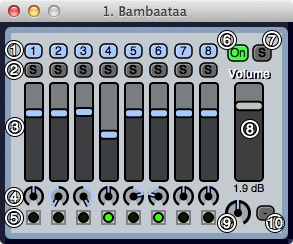
- Channel On/Off - turns the channels On and Off.
- Channel Solo - Solos the channels.
- Channel Volumes - the volume for the individual drum channels.
- Channel Pan - the pan setting for each channel.
- Channel Lamps - indicates if the channel is playing.
- On/Off - turns whole instrument On/Off. Right mouse or Alt-click will turn other instruments On/Off as well.
- Solo - solos this instrument. Right mouse or Alt-click will solo just this instrument.
- Master Volume - the master volume for the whole instrument.
- Master Pan - the master pan for the whole instrument.
- Expand / Collapse - expands the whole instrument or collapses to the channel mixer.
Main Sequencer (Overview tab)
This is where you design your drum patterns. Controls allow for poly rhythmic compositions with separate speed and durations for each channel.
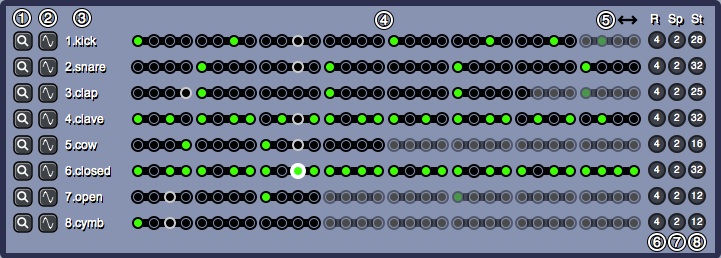
- [Magnifying Glass] - opens the Web Browser to open or find new samples.
- [Wave] - opens the Sample Player with the sample being used.
- Channel name - the name of the channel is the same as the sample selected.
- Sequencer - the sequencer of each channel. Click on each beat to turn it on or off. Right click and drag draws beats on and off.
- Shift left/right - press and hold the mouse button to move the whole pattern left or right in the sequencer.
- Ruler - a visual aid that divides the bar up into beats of this length.
- Speed - a divider of the clock tempo. Higher values go slower. i.e when set to 4 the sequencer will go at a 1/4 of the maximum song tempo..
- Steps - the total duration of the sequence.
Main Controls (Overview tab)
Here you have control of how all the channels produce their sounds. These settings can be overridden in the individual channels.
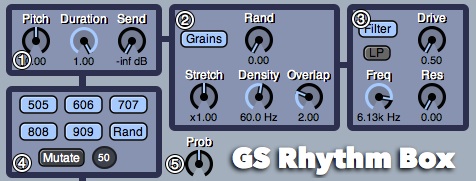
- Pitch, Duration & Send -
- Pitch - master pitch of all channels.
- Duration - master duration of all channels.
- Send - master effect send of all channels.
- Grain Controls - master control of grains, these settings can be overridden in the individual channel controls.
- Grains On/Off - turns granular synthesis on or off.
- Random - randomise the pitch and density of individual grains. This helps reduce the comb filter like effect of granular synthesis.
- Stretch - time stretches the duration of the samples.
- Density - density of the grains.
- Overlap - how much the grains overlap each other.
- Filter Controls - master filter controls, these settings can be overridden in the individual channel controls.
- Filter On/Off - turns the filter on or off.
- LP / HP - high pass or low pass filter.
- Drive - drives the filter to distortion.
- Frequency - the cutoff frequency of the filter.
- Resonance - the resonance of the filter.
- Drum Controls -
- Drum machines - changes all the sample banks to either the 505, 606, 707, 808 or 909. Rand will randomly select a drum from that bank.
- Mutate - mutates the beats of the sequence by adding, moving or deleting random beats.
- Mutate amount - the amount of mutation applied to the sequencer.
- Probability - scales the probability of beats happening. Probability has to turn on in the individual channels for this to take affect. Normally the velocities in the sequencer control the amplitude of the drums. When this is used, the sequencer controls the probability of that hit / beat happening. At maximum velocity, the drum will play 100% of the time (i.e always play), at minimum velocity it will play 0% of the time (i.e. never) and all the values in between.
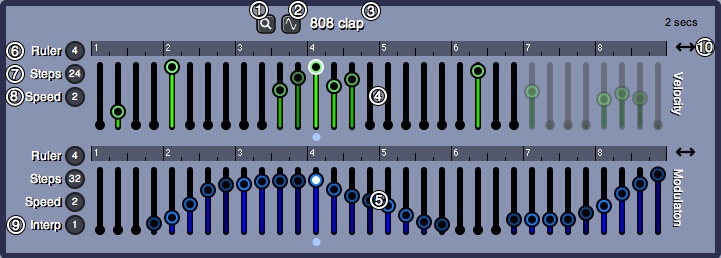
Channel Sequencer
Each channel has its own sequencer and greater control of that sequence can be gained here. The top row is duplicated from the main sequencer but allow fine control of the velocity. A modulation sequencer is located beneath that.
- [Magnifying Glass] - opens the Web Browser to open or find new samples.
- [Wave] - opens the Sample Player with the sample being used.
- Sample Name- also opens the Web Browser.
- Velocity Sequencer - this sequencer controls the velocity for each drum channel. It says where the beats will happen and what velocities they play at. Higher values result in higher amplitudes.
- Modulation Sequencer - the sequencer that controls the modulation applied to the parameters in the channel controls (The smaller knobs in a darker blue colour).
- Ruler - a visual aid that divides the bar up into beats of this length.
- Steps - the total duration of the sequence.
- Speed - a divider of the clock tempo. Higher values go slower. i.e when set to 4 the sequencer will go at a 1/4 of the song tempo.
- Interpolation - the numbers of steps the sequencer interpolates between adjacent values in the sequence.
- Shift left/right - press and hold the mouse button to move this pattern left or right in the sequencer.
Channel Strip
The channel strip appears at the top and it manages the general controls of each drum channel.

- Sample Bank - the various sample banks available. These include the 505 to the 909 Kits, Kicks, Snares, Rims, Claps, Toms, Misc, Hats, Cymbs and a user defined group which holds all the samples added via the Web Browser.
- Sample - the sample being played by this channel.
- R - turns on random. Every time a random sample is chosen from the list.
- P - this turns probability On or Off. Normally the velocities in the sequencer control the amplitude of the drums. When this is turned on, the sequencer controls the probability of that hit / beat happening. At maximum velocity, the drum will play 100% of the time (i.e always play), at minimum velocity it will play 0% of the time (i.e. never) and all the values in between. There is a single master Probability in the Main Controls which scales these probabilities.
- Choke - grabs and chokes the other channels that share the same numbered group. This is useful for open & closed high hats.
- Audio send channel - this sets where the audio send of this channel is going. (i.e Which audio output bus or which effect bus)
- Audio out channel - this sets where the audio output of this channel is going. (i.e Which audio output bus or which effect bus). If this is set to Master then the audio will be sent to the same location as the instrument's Control Strip
Channel Controls
This is where you can control the sound of the individual drum channels.
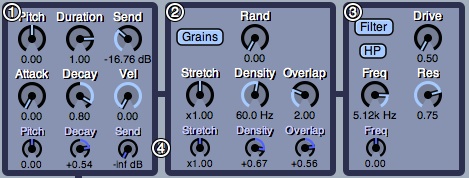
- General Controls - general channel controls.
- Pitch - master pitch of the channel.
- Duration - master duration of the channel.
- Send - the level of signal sent to the effects bus.
- Attack - the amount of attack on the amplitude envelope. Higher values result in longer lead in times.
- Decay - the shape of the amplitude envelope when it decays. Lower values result in shorter sounds.
- Vel - the amount the velocity affects the amplitude.
- Grain Controls - channel control of grains, if turned on these settings will override the ones in the master controls.
- Grains On/Off - turns granular synthesis on or off.
- Random - randomise the pitch and density of individual grains. This helps reduce the comb filter like effect of granular synthesis.
- Stretch - time stretches the duration of the samples.
- Density - density of the grains.
- Overlap - how much the grains overlap each other.
- Filter Controls - channel filter controls, if turned on these settings will override the ones in the master controls.
- Filter On/Off - turns the filter on or off.
- LP / HP - high pass or low pass filter.
- Drive - drives the filter to distortion.
- Frequency - the cutoff frequency off the filter.
- Resonance - the resonance of the filter.
- Modulation - there are several knobs along the bottom which apply the modulation sequencer to those parameters. These include Pitch, Envelope, Send, Stretch, Density and Filter cutoff frequency.