LNX_Studio is designed for collaborations in real-time over the Internet or a Local Area Network.
The Networking Approach
Overview
As a User you have a simple profile which you can edit. When you connect, your profile appears in a room along with anyone else in that same room.
Rooms are places where you can meet people and start a collaboration together. When you first start using LNX_Studio you will be connected to the room home. This is a special public room designated for meeting people. Once here, you can invite or be invited to a public or private room to make music in. Or if you wish you can create your own private rooms and arrange for people to meet you there instead.
Once in a collaboration you are making a Group Song together. All the instruments created in this song are available for everyone to hear, edit, copy and delete. There is no ownership or license agreement prior to starting a collaboration, that is for you to sort out amongst yourselves.
Virtual Private Network (VPN)
The best way to start an on-line collaboration is using a VPN like Hamachi. https://www.vpn.net. A VPN enables users to send and receive data across shared or public networks as if their computing devices were directly connected on a local network .
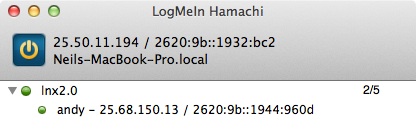
The Hamachi service is free for 5 computers and once you are signed up you can either create a network or join an existing one. Above we have 2 people connected on the lnx2.0 network. Andy has the IP address of 25.68.150.13 and Neil has 25.50.11.194. These IP address can be used in a LAN connection below.
Linux: Haguichi provides a graphical frontend for Hamachi. https://www.haguichi.net
Local Area Network (LAN)
All LNX_Studio requires for a LAN connection is the IP addresses of the computers being used. There is a search facility which looks for them for you, but if that fails you can manually type in addresses you wish to search.
Internet (OscGroups)
OscGroups is a another way to start internet collaborations. This method is less reliable than using a VPN / LAN and will be deprecated in future versions.
A Server is needed to send all the real-time messages from one machine to another. You can create your own Server (see network preferences) or you can connect to one already running on-line. Currently a server is been maintained at realizedsound.moo.com
LNX_Studio uses a client program to connect to these servers. If you have security software then allow LNX_Client to communicate on port (22242). If you have a firewall installed on your machine you may need to ensure that the LNX_Client is registered. If you update the program you may need to re-register it.
The Network Window
To start, open the Network Window. This is in the File Menu or press the [Net] button in the studio window.
The Address Bar runs along the top, the Room sits below that. A list of users in the room is on the left and a chat room dialog to the right. Profiles can be seen below the dialog and people can be invited in the bottom section of the window.

Local Area Networks
When connecting via LAN you need to specify which IP addresses are being used. The address bar has two purposes: to set which IP address you are using and to search for other peoples IP address

- The Network Menu - see The Network Menu below.
- Room - the name of the room.
- Go - go to room on the LAN (no password is used).
- Local Area Network - the IP address to search for.
- Search - will search for other machines running LNX_Studio. If found, the machine will be added to the network. Normally when connecting via a router you will not need to type in an IP address and just pressing Search will locate others for you. You may need to manually type the IP address of other machines if you are creating your own wireless Computer-to-Computer Network. Your own IP address will be shown in the room dialog.
- My Address - If you have more than one network connection then choose the IP address you wish to connect with here.
- On/Off - closes any collaborations, disconnects from the server and closes this window.
Internet
When connecting via the Internet each room is comprised of 3 things: a room name, a server address and a room password. You can move to or create a new room by typing its name, address and password here and then pressing Go. If the room doesn't already exist then the server will create one for you. Then only people with the same room name, address and password can enter that room. These rooms are managed in the Network Menu.
The address bar has several purposes: to set which IP address to use or to search for other people by IP address

- The Network Menu - see The Network Menu below.
- Room - the name of the room.
- Server Address - the address of the server (this can also be a numerical IP address).
- Password - the Password for the room.
- Go - go to room Room@ServerAddress using Password.
- On/Off - closes any collaborations, disconnects from the server and closes this window.
Public and Private Rooms
All rooms named 'home' are designated as public rooms (a place to meet and invite people into separate private rooms). If you want to make music in a public room there are 3 rooms called studio1, studio2 and studio3 enabling you to do this. All public rooms use the password 'password'. Whilst in these rooms you have the option of hiding your email and Skype name.
All other rooms are called private rooms because you would either have to know of their existence or be invited to one by another person. You are able to make music in these rooms without been disturbed by users you haven't invited. Once in a private room your email and Skype will be available to the people in that room to view.
The Room
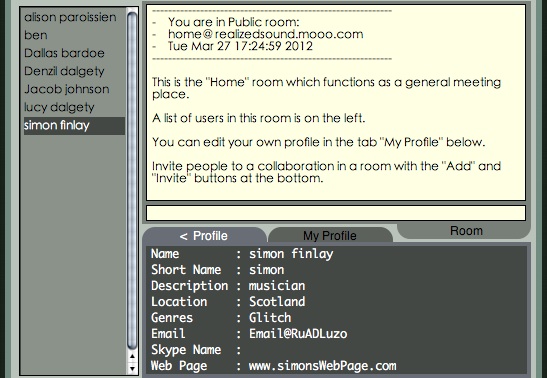
On the left hand side you can see a list of users in the current room. If their name starts with an asterisk * it means they are in collaboration. You can click on any of these and their profiles will be displayed in the profile tab on the bottom right.
On the top right is a chat room style dialog box with a text field to add your own text in. Other useful information will be displayed here.
Profiles
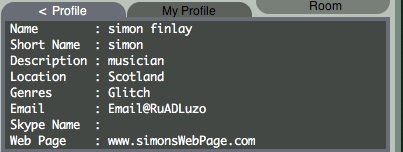
There are two profile tabs. One called < Profile used to display other peoples profiles and one called My Profile where you can edit your own profile.
The fields in the profile are:
- Name - you can put your full name here if you want to.
- Short Name - short name is limited to 8 characters and is used when space is limited on the screen.
- Description - what you do. For example musician, producer, programmer, etc...
- Location - village, town, city or country.
- Genres - what type of music you like making.
- Email - your email address.
- Skype - your Skype name.
- Web page - your web page, if you have one.
About Privacy
None of your personal information is kept by the server, it is stored locally on your machine. It can be found in the folder /users/user/library/preferences/lnx_studio/userprofile. You can only have one profile on your machine at a time and this will be used whenever you load LNX_Studio. By default your email and Skype name will not be shown in public rooms. This can be changed in the network preferences. I recommend that you don't put any information in your profile you don't want others to know about.
Creating Invites
To Host a collaboration you need to make a list of users and then invite them to join you.
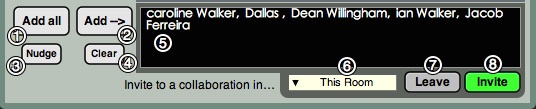
- Add all users - add all the users in the room to the invite list.
- Add a user - add the selected user to the invite list.
- Nudge - nudge a user. Someone might not respond to the room dialog because their network window is either hidden or closed. Nudge brings this window to the front of their screen and so grabs their attention. You can only nudge someone once every 30 seconds.
- Clear - remove all users in the invite list.
- Invite List - the list of people you would like to invite to the collaboration.
- Invite location - the location of the invite. You can choose either The Current Room, A Private Room or Studio1-3 (Public). Private rooms will be made for you with random names and passwords as needed.
- Leave Collaboration - if you are in a collaboration this will remove you from it. The Group Song you were working on will still remain loaded in the studio.
- Invite to Collaboration - press this to send the invite.
Once you have invited people to a collaboration you will need to wait for them to agree to it. You can not invite people who are already in a collaboration.
The Invite Process
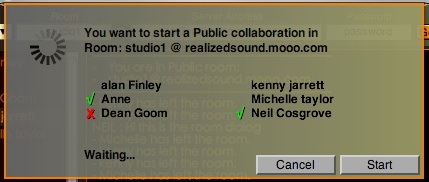
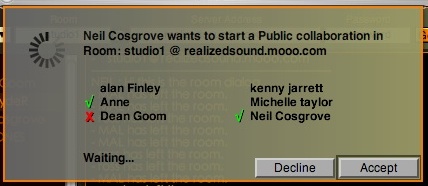
The 1st invite is from the Host's machine, waiting for responses to his request. The 2nd invite is received on the User's machine and awaits their confirmation. Both show a list of who has said yes and no.
The Network Menu
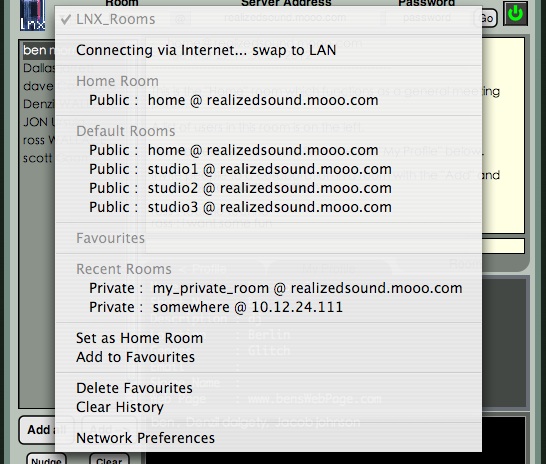
You can manage the rooms and locations you visit from within this menu.
- Connecting via Internet / LAN - swap between a Local Area Network and the Internet.
- Home Room - this is your home room and where you will go when you 1st open the network window.
- Default Rooms - these are the default public rooms supplied by LNX_Studio for you to use.
- Favourites - a list of your favourite rooms.
- Recent Rooms - a list of rooms you have been in recently.
- Set as Home Room - set the current room as your home room.
- Add to Favourites - add the current room to your list of favourite rooms.
- Delete Favourites - will delete all your favourite rooms.
- Delete History - will clear the list of recent rooms you have visited.
- Network Preferences - you can access the network preferences here and create your own server.
Network Preferences and Creating Servers
LNX_Studio uses the programs OscGroupClient and OscGroupServer by Ross Benciania. You can read more about them here.
http://www.audiomulch.com/~rossb/code/oscgroups/
In the context of this program I have renamed them both as LNX_Client and LNX_Server. I am not taking any credit for these great programs. I have just renamed them for the sake of continuity. When a user looks at the Activity Monitor they will be able to see LNX_Studio, LNX_Client and LNX_Server running side by side.
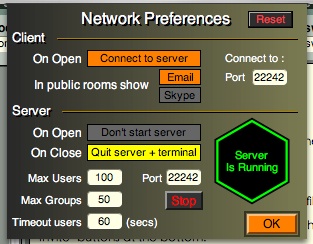
Client
If you want LNX_Studio to connect to your Home room when it opens then select On Open [Connect to server]. You can choose to show or hide your email and Skype name in public rooms. Normally the client connects to the server on port 22242 but this can be changed here if conflicts with other applications occur. For this you would need to create your own server and the port it listens to.
Server
If you want to start a server when you open then select On Open [Start a Server] If you then want it to quit when the studio closes then select On Close [Quit server + terminal].
You can set the following parameters prior to launching a server. Any changes made whilst its running will take affect after it's re-launched.
- Max Users - the maximum number of users that can be connected to the server at the same time.
- Max Groups - the maximum number of groups / rooms those users can create. Groups and rooms are equivalent.
- Timeout users - the time it takes for the server to forget a user.
- Port - the udp port the server listens on.
The server will be launched in a terminal window and you can monitor its traffic there. To start and stop it manually use the Start & Stop button. The icon on the right will show you the current server status.
In order for the server to work you need a static IP address. If you are behind a router you can find this by using web sites such as:
http://www.myipaddress.com/show-my-ip-address/
This will then be the server address that others need to connect to. If you are using a router you will need to do port forwarding from the router to your machine on Port (22242). You can find out how to do this in your router's instruction manual. Note: If you have security software then allow LNX_Server to communicate on Port (22242) or whichever port you are using.