This is the main window. Most of the studio can be controlled from this window. In here you can find the File Menus & Transport Controls along the top. On the left is the Library where you find the various modules, instruments and effects. Bottom left is a Dialog Box used for communications. In the middle you can find the Mixer Tab, the Program Tab or the Automation Tab depending on which is highlighted along its right hand edge. On the right you can find the Effects and the Main Volume. On the bottom right are the MIDI Tools.
This is how the window looks when its empty.
and this is how it looks, full of the instruments & effects you find in a project.

Menus & Transport Controls
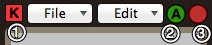
- File menu.
- Open... - opens a song(s). If multiple items are selected, they will all be added to a new Menu called Songs, where you can easily browse and choose items.
- Open last song - Opens the last song that was opened or saved
- Save - saves this song.
- Save As... - saves this song as...
- Add Instrument to Library - adds the selected instrument or effect to the library.
- Close Song - closes this song.
- Network - connect to other users on a network here.
- Preferences - audio & MIDI settings.
- Edit menu.
- Copy - copies the selected instrument.
- Paste - pastes the instrument. (This only works on the same type of instrument as the one you copied).
- Duplicate - duplicates the selected instrument.
- Delete Instrument - deletes the selected instrument.
- Edit all MIDI controls - edit all the MIDI controls available in the studio and it's instruments.
- Show All - show all instruments or show one at a time. The selected instrument will be visible and the others hidden.
- Hide All - keep all instrument windows hidden. If there are too many windows open then use this to manage them, it is more efficient than closing them individually.
- Int/Ext - use the Internal Clock or an External MIDI Clock.
- Tempo - the current tempo in BPM.
- Tap - click here to tap the tempo of the song.
- Rec - start recording to the desktop as an AIFF.
- Bar - the current song position / bar playing.
- Rewind - skip the song position back 1 bar.
- Play - start playback. Yellow when using an external MIDI clock. Green when using the internal clock.
- Stop - stop playback. One click stops play, two clicks rewinds to the beginning and 3 click sends out MIDI panic messages to everything.
- Forwards - skips the song position forwards 1 bar.
- Time - the time since the start of the song in seconds.
- On/Off - status of the sound server. One click resets the sound server & two clicks quits + relaunches the sound server. This is useful if LNX doesn't make the sound its suppose to.
- Net - status of the network. Yellow is on and green means you are connected to a collaboration. Clicking on this opens the network window.
- CPU % - CPU being used by the sound server.
- Fade speed - the speed of the auto fade buttons in the mixer. Either Slow, Medium or Fast.
The Library
This is where you will find the various modules, instruments and effects used in LNX_Studio. You can add and remove items to this library as you start to gather your own instruments and effects. To add an instrument first select it and then go to the File menu in the studio window. Choose "Add Instrument to Library" and you will then be prompted to supply a name. The instrument will be added under its type in the library.
As new content becomes available you can update your library by selecting "Check for Library Updates" in the Tools menu. Here you can "Open Library in the Finder", which on MacOS is located in the folder users/user/music/LNX_Studio Library or "Backup Library to Desktop". If you delete any of the default instruments that come with LNX_Studio you can restore them by choosing "Restore Library Defaults" from the same menu.
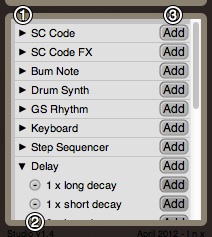
- Show/Hide Instruments - show or hide this instrument's library.
- Delete Instruments - Delete this instrument from the library.
- Add instrument - Press these to add an instrument / effect to the studio.
Instruments, Effects & Modules
In the library you will find the following instruments, effects & modules
- GS Rhythm - a granular drum machine with Web Sample support.
- Bum Note 2 - a polyphonic subtractive synthesiser with built-in sequencers.
- Drum Synth - a drum synth with a built-in step sequencer.
- SC Code - a polyphonic SuperCollider Code module with Web Sample support. You can create your own instruments in SC Code.
- Moog Sub 37 - an interface for the Moog Sub 37 synthesiser.
- Roland JP-08 - an interface for the Roland JP-08 synthesiser.
- Volca Bass - an interface for the Korg Volca Bass synthesiser.
- Volca Beats - an interface for the Korg Volca Beats drum machine.
- Volca Keys - an interface for the Korg Volca Keys synthesiser.
- Audio In - an external audit input.
- External Instrument - an interface for an external MIDI synthesiser.
- Step Sequencer - a 32x8 step sequencer.
- Keyboard & Controls - a virtual MIDI controller keyboard.
- Melody Maker - a tool box for creating melodies and chords.
- SC Code FX - a SuperCollider FX module. You can create your own effects in SC Code FX.
- External FX - a send and return for external effects.
- GVerb - the "GVerb" LADSPA reverb effect by Juhana Sadeharju (kouhia at nic.funet.fi).
- FreeVerb - SuperCollider's FreeVerb coded from experiments with faust.
- Drive - a distortion.
- Delay - a delay.
- PitchShift - a pitch shifter.
- Ring Mod - a ring modulator.
The Mixer
Here you can find many of the controls you would find on a mixer including things like turning instruments on or off, soloing, levels and effect sends.
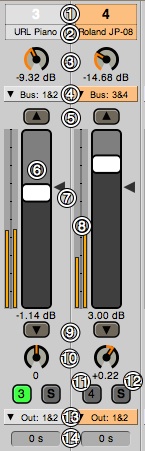
- Instrument number - the currently selected instrument. You can open the instruments window with this or drag them around the mixer to change their order. If a coloured user icon is here then another user has this instrument selected. (If the icon is white, this means more than one user has it selected).
- Instrument name - you can edit names here or drag the instrument around the mixer to change their order.
- Effect Send - the amount the instrument sends to the effect's bus.
- Effect Bus - which effects bus to send to. The internal stereo buses used by effects are called Bus 1&2, Bus 3&4, etc... The stereo outputs of your sound-card are called Out 1&2, Out 3&4, etc...
- Auto Fade In - automatically fades the instrument to the peak volume level. The speed is set in the transport controls along the top.
- Volume - the volume of the instrument in decibels.
- Peak Volume - the peak level of the instrument. Used as the target volume for the automatic fade in. It can also be used as a reference.
- Level meters - show the signal level of the instrument. (RMS 1.5 seconds average in decibels).
- Auto Fade Out - automatically fades the instrument down to silence. The speed is set in the transport controls along the top.
- Pan - the pan position of the instrument in the stereo field.
- On/Off - turns the instruments on or off. Alt or right click will turn other instruments On/Off as well.
- Solo - solos this instrument. Alt or right click will solo just this instrument and remove any other solos. Effects can not be soloed.
- Output Channel Bus - the audio output channel for the instrument. The stereo outputs of your sound-card are called Out 1&2, Out 3&4, etc... The internal stereo buses used by effects are called Bus 1&2, Bus 3&4, etc...
- Sync - synchronise the individual instruments in seconds. You can start them early or delay them depending on your needs. This is useful if you are using external audio equipment or Phase Vocoder / Fast Fourier Transform effects which naturally delay audio. If you need to synchronise all external MIDI equipment there is also a dedicated Global MIDI Sync found in the preferences.
Effects
Here are the master controls for of the effects. This includes the buses they use and how loud they are.
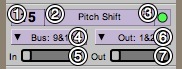
- Effects number - the currently selected effect. You can open the effects window with this or drag them around the mixer to change their order. The effects are processed in order, from top to bottom. This means you can have several effects chained in serial on 1 bus and change the order in which they process the audio. Alternately you could also have several effects reading the same bus in parallel. (See the Effects help file for more details on this) If a coloured user icon is here then another user has this effect selected. (If the icon is white, this means more than one user has it selected).
- Effect name - you can edit names here or drag the effect around the mixer to change their order.
- On/Off - turns the effect on or off. When off the effect is bypassed but still sends audio to the output bus.
- Input Bus - the input bus for the effect. Choose one of the 16 stereo buses named Bus: 1&2 to Bus: 31&32
- Input Amp - the gain of the input going into the effect.
- Output Bus - the output bus for the effect. The stereo outputs of your sound-card are called Out 1&2, Out 3&4, etc.. or you can forward it on to another effect bus which are called Bus 1&2, Bus 3&4, etc...
- Output Amp - the gain of the output coming out of the effect.
MIDI
These are the master controls for the MIDI modules.

- MIDI module number - the currently selected module. You can open their window with this or drag them around the mixer to change their order. If a coloured user icon is here then another user has this module selected. (If the icon is white, this means more than one user has it selected).
- MIDI module name - you can edit names here or drag the module around the mixer to change their order.
- On/Off - turns the module on or off.
- Always - means the module is always on regardless of whether solo is active or not. This is useful if you have a several instruments being sequenced or controlled by a Melody Maker or a Step Sequencer.
Master volume
These are the master volume controls for the studio.
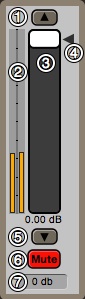
- Auto Fade In - automatically fades the volume to the peak volume level. The speed is set in the transport controls along the top.
- Level meters - show the signal level of the studio. (RMS 1.5 seconds average in decibels).
- Volume - the volume of the studio in decibels.
- Peak Volume - the peak level of the studio. Used as the target volume for the automatic fade in. Can also be used as a reference.
- Auto Fade Out - automatically fades the volume down to silence. The speed is set in the transport controls along the top.
- Mute - this will mute all sound coming out of LNX_Studio.
- PreAmp - this adjust the amplitude of all tracks before they are put through a Limiter prior to output. Its the volume slider that adjusts the amplitude after this Limiter.
Users & The Networking Dialog
This is the Network Dialog, use this to message users in a collaboration. LNX will also post information here.

- Messenger - a dialog box showing messages from both the collaboration and the current room.
- Text input - type your messages here. They will only be seen by other in the collaboration and not by others in the current room.
- Users - a list of all the users and their colour. If the user is blacked out then they are no longer connected. The speaker symbol shows you if they are listening to the "group song". See Networking for a description of the "group song".
- Listen to group song - when selected, you will hear the "group song". When unselected you can turn instruments on/off and it won't effect what others are hearing.